Beyond Finance Manager FAQs.
Beyond Finance Manager is a tool to be in control of your finances. Track where your money is coming from and where it's going to or set up a savings goal and we’ll show you what you need to do to achieve your goal and track your progress all the way.
Managing your money is made easy because all your expenses and income are automatically categorised.
If you are set up for internet banking, you will have access to some insightful features that will help you to manage and monitor your spending habits, helping you along the path to financial freedom.
The Beyond Finance Manager Setup section is the first screen you will need to access to start using the Beyond Finance Manager features.

Once you click the link to the Setup page, you will be presented with a step by step process. You are also able to commence this process by selecting the Beyond Finance Manager images on the Account Balances screen.
Once you have setup up Beyond Finance Manager, this section will become Beyond Finance Manager settings. This section is where you can change the accounts that you wish to view to track your spending.
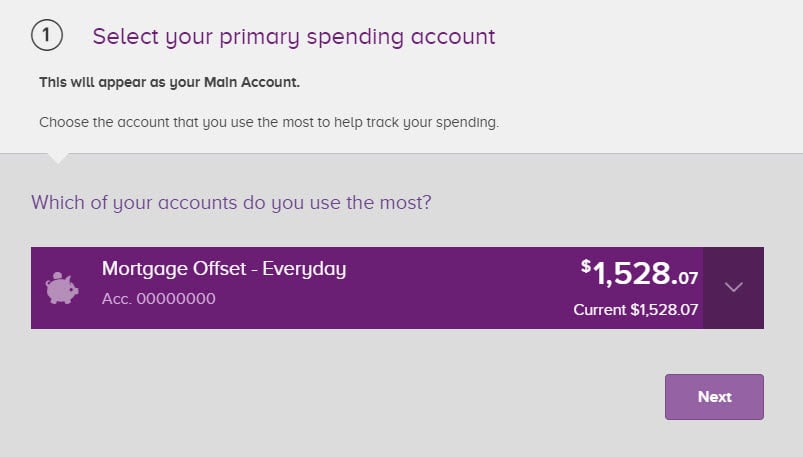
1. Use the drop down box to view a list of all of your accounts. Step one asks you to select your Main Account, so choose the account that you make the most transactions from (this may be the account attached to your card).
When you have selected the account, click Next to progress to the next step.
2. The second step in the setup process will ask for all other accounts that you use to make transactions.
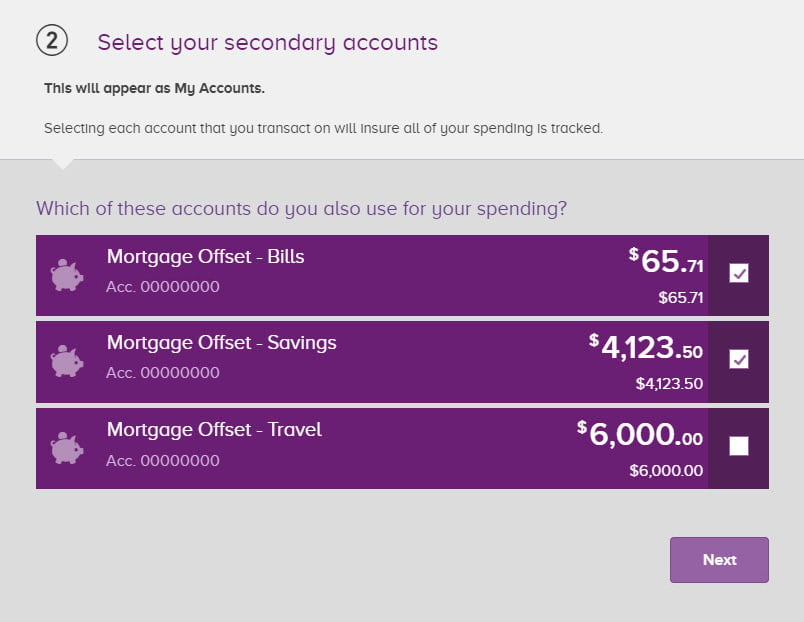
Include all of the accounts that you would like to keep track of by checking the boxes on the right. This may include accounts that you have setup to pay bills, or rent from.
When you have selected all of the accounts you would like to include in the Beyond Finance Manager calculations, click Next to progress to the final step.
You can see your spending habits in Beyond Finance Manager. Money Going provides an overview of where you are spending your money by categorising your transactions.

Belw we will look at how to use all of the functions on the page.
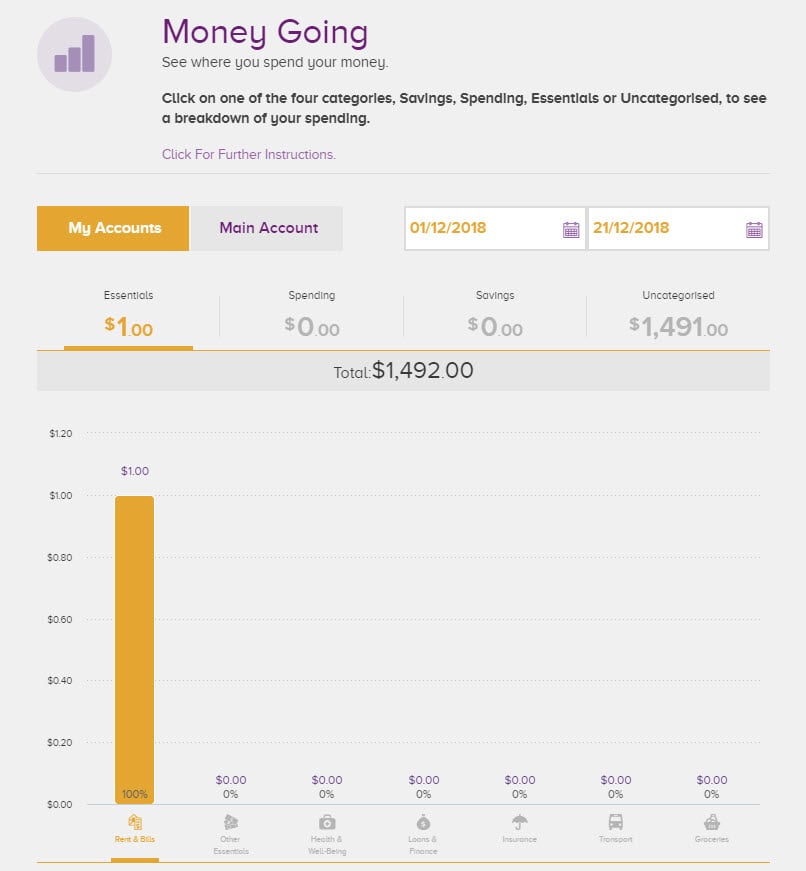
1. Click on the text 'Click for Further Instructions" to show more information about the page you are currently on.
2. Toggle between views for your main spending account and all of your Beyond Finance Manager accounts by clicking My Accounts or Main Account.
3. Choose the date range for the period in which you would like to view your transactions. The maximum date range is three months.
4. All of your groups, Savings, Spending, Essentials, and Uncategorised, are shown above the graph. Click the total figures for each group to see a graph that breaks down the transactions in that group into categories.
5. Each bar in the graph represents a category. To see a breakdown of that category, click the bar to see the transactions listed below.
When you have completed the Beyond Finance Manager setup process, most of your transactions will be placed into categories automatically. There will be some that we are not sure about though, and you can categorise them either on the Money Going page or the Transaction History page, just look for the ellipsis:
To re-cateogorise transactions, clicking on the ellipsis on the Money Going page or the Transaction History page will display the manual categorisation screen: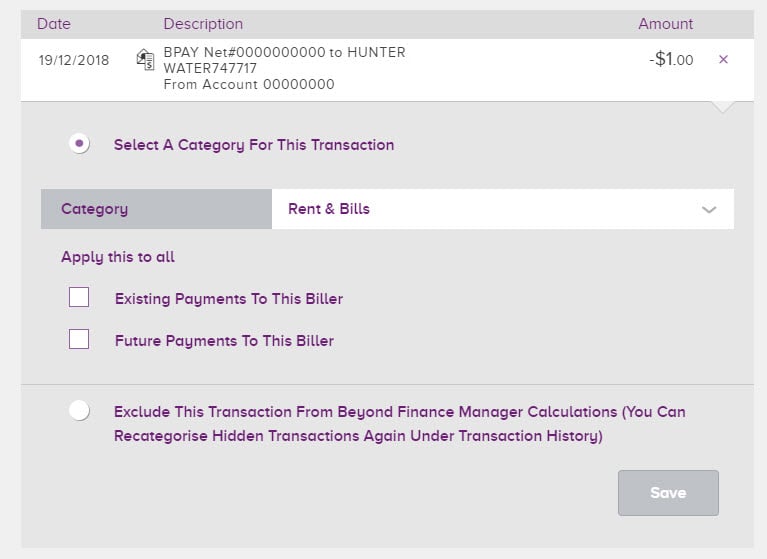
- Details of the transaction will be visible above the manual categorisation screen. You will also see a question mark next to the transaction itself, which indicates its category is in question.
- Click the drop down arrow to see a list of all categories and choose a new one for the transaction in question.
- You can choose to either apply this change to just the one transaction, all existing transactions for this merchant or all future transactions. For a universal change you should check the box for both existing a future debits.
- If you would like to not use a particular transaction in Beyond Finance Manager transactions, check the box "Exclude this trasaction from Beyond Finance Manager calculations"and it will become ‘hidden’. You will still be able to see ‘hidden’ transactions in Transaction History.

Money Schedule shows a calendar view of all debits and credits to your account in a given month.
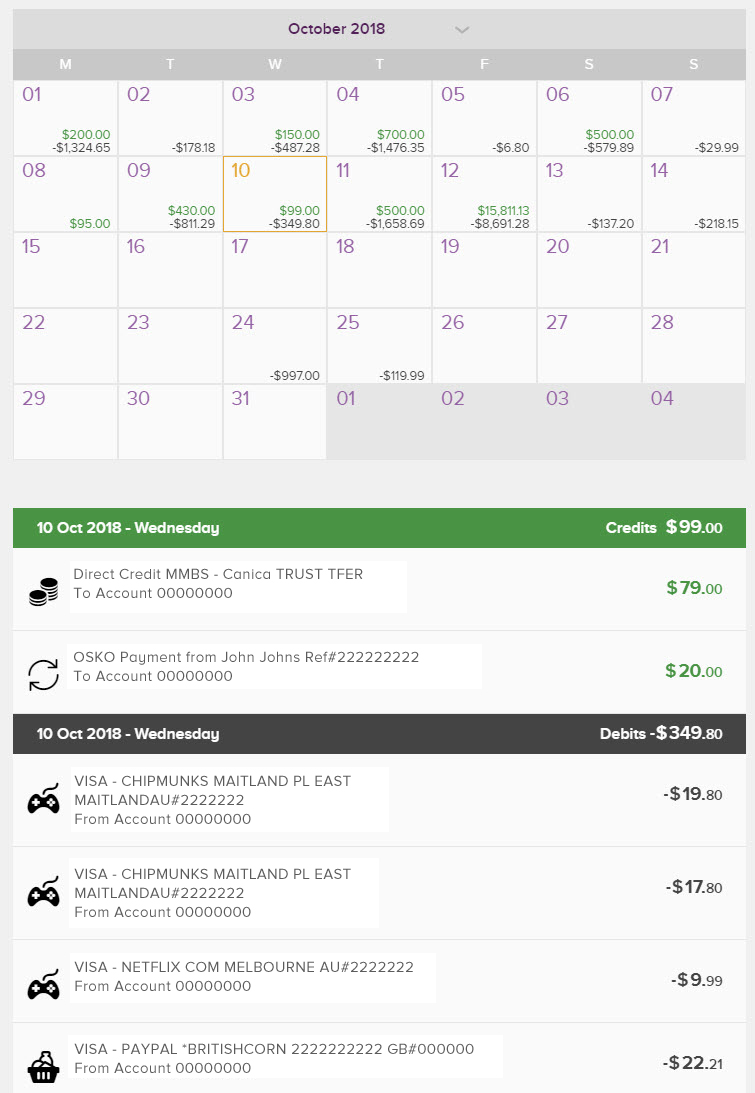
1. Choose a month in the last year to view the calendar for that period.
2. Select a date to view that day’s individual transactions.
3. The date selected will be visible on the left of the purple bar under the calendar.
4. The total amount that was spent on the date selected is shown on the right of the purple bar, and the individual amounts are shown below.
5. Details of the recipient are visible to the left of individual transaction amounts, similarly to transaction history.
![]()
Spend Tracker shows how much money you have spent during a month and allows you to compare previous months.
![]()
1. Click the further instructions information link for more information about the spend tracker.
2. Toggle between views for your main spending account and all of your Beyond Finance Manager accounts by clicking My Accounts or Main Account.
3. To compare different months, click the drop down arrow and select a month within the last year.
4. The totals for each month will be displayed on the last day of that month. If you are viewing the current month, and the month is not yet complete, you can find the total above the current date.
5. You can click an individual date along the bottom of the graph, or an individual plot point on the graph itself to see a list of all of the transactions for that day (see below).
![]()
On the Spend Tracker page displays a combined list of transactions on a particular day for every category. You can refer to the legend for all category icons on the right side of the screen.
To move transactions into different categories, navigate to the Money Going page or the Transaction History page and click the ellipsis (…) to the right of the transaction.
A simplified version of the spend tracker can also be found in our award winning mobile app. You can find the spend tracker icon in the top right-hand corner after viewing an account:
Simply tap the icon, click 'Track your spending' on the next page and review your daily spending.
With the mobile app version, you can view your daily spending and a comparison to that day's spending for the previous month. Want to see how your spending went a few months ago? Scroll back as far as you like and see how your monthly spending has evolved.
![]()

Goals allow you to set up a new savings account and dedicate it to reaching your dreams, by setting up recurring savings payments and showing your progress as you get closer to reaching the goal.
Creating a goal.
Clicking the Goals icon in the navigation bar at the top will take you to the Goals home screen.

To get started, click Create New Goal. You will be presented with the screen overleaf.
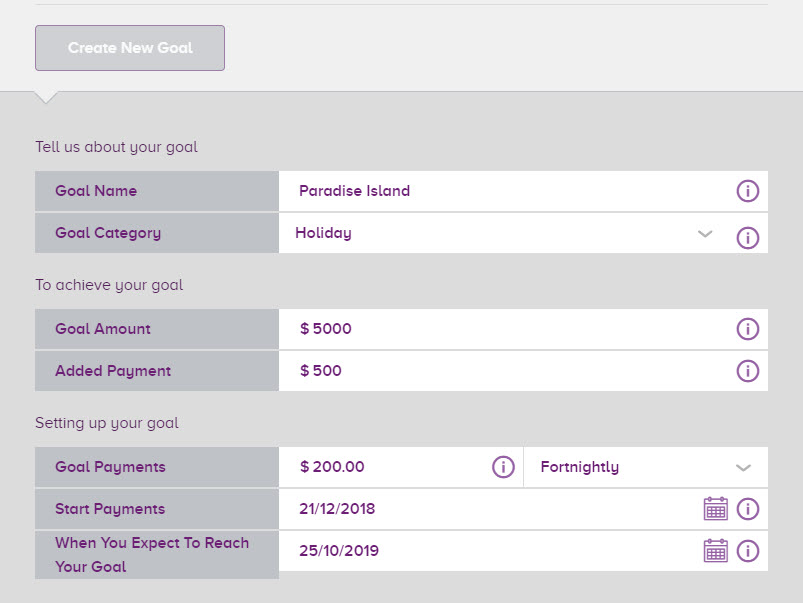
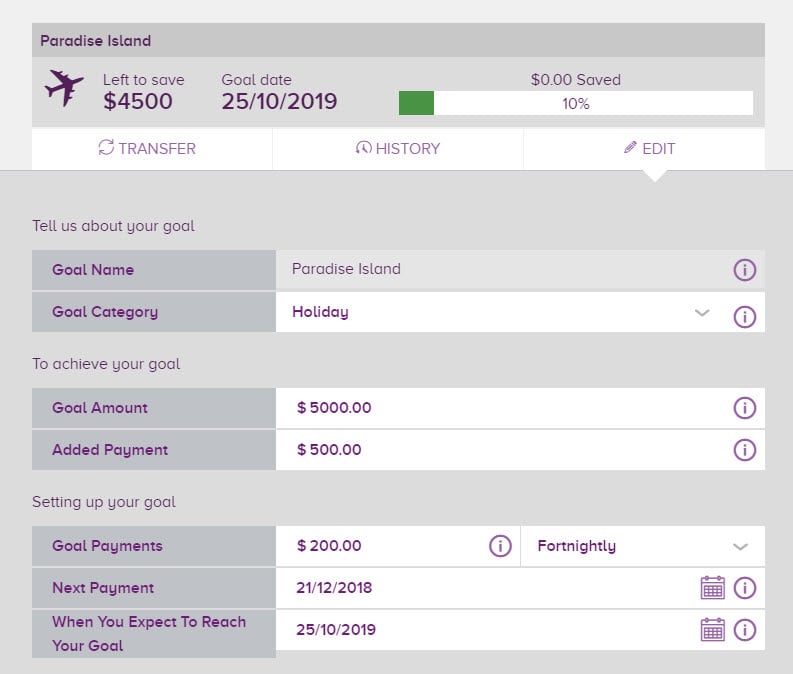
1. Enter the name that you would like for your goal. This name will display as the account name when you view the account under Account Balances.
2. Select a category for the goal. This will assign an icon, which will help if you have multiple goal accounts.
3. Enter the amount that you need to save to reach your goal. This can be any amount between $1-1 million.
4. The added payment field is for any payments that will be made to this goal that you do not need to save. For example, if you are saving for a car and already have a car that you plan to trade in, enter the amount that you expect to receive for the trade in. If you have some cash saved under your bed that you plan to spend on this goal, enter the amount that you have saved in this field.
5. Enter the amount that you would like your regular contribution to be.
6. Enter the frequency at which you would like to make regular repayments.
7. Enter the date that you would like to start making payments in the Start Payments field. This will automatically update the field below, depending on the amount, frequency of your regular repayments, and the date of the first one.
Further down the screen you will see the account selector and confirmation section:
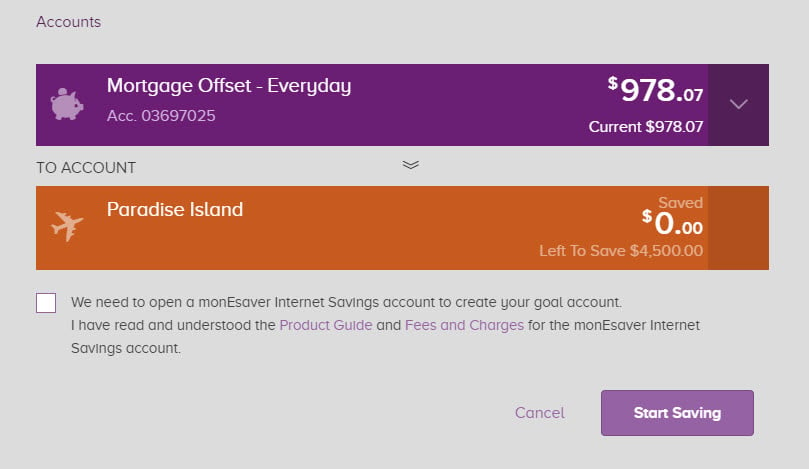
1. Select the account that you would like the regular payments to come from.
2. This section is an indicator only. It is what the goal account will look like when it’s created.
3 Tick the box to when you have read the relevant details, then click Start Saving when you are happy with all of the details you have entered.
Clicking Start Saving will take you to the confirmation screen:
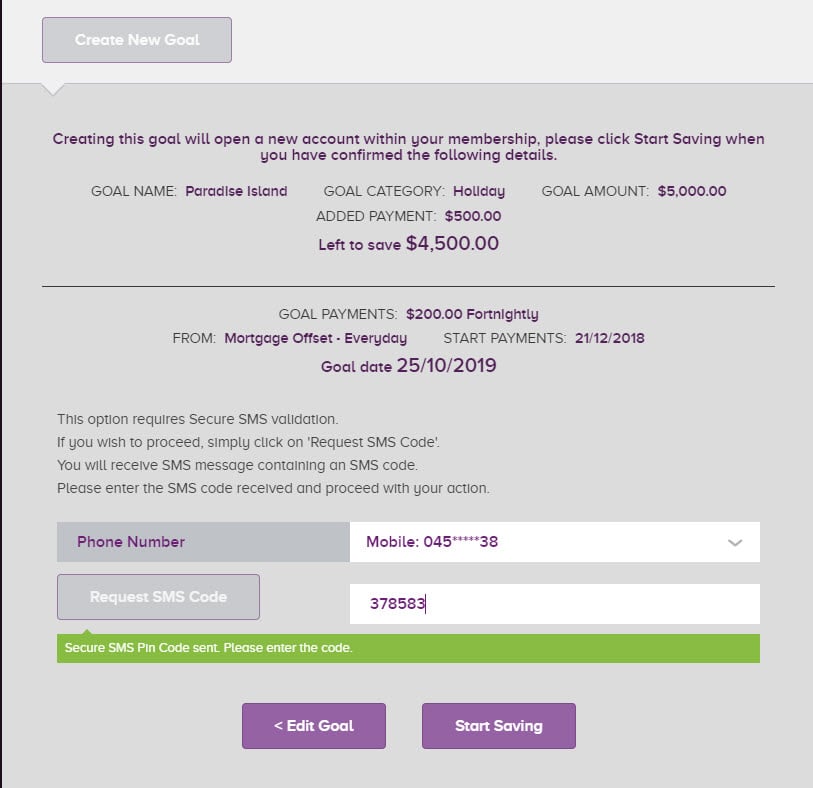
1. Click Edit Goal if you have noticed anything that needs to be changed. This will take you back to the Create a Goal screen.
2. Click Start Saving to confirm all of the details shown and create your goal.
Once created, the goal will appear on the Goals overview page.

1. Left to save shows you how much more you need to reach your goal.
2. Goal date shows you the estimated date of achieving your goal, assuming that all regular payments are made.
3. The Saved bar shows you how much you have saved towards your goal.
4. This section houses the links to all of the sections related to your goal account. Transfer will take you to the Transfer screen, with your goal account selected the recipient account. History will take you to the Transaction History page for the corresponding goal account. Edit will take you to a screen where you can change any details of the goal account, or delete it.
Clicking Edit on a goal listed on the Goals Overview screen will expand the goal and present you with a screen similar to the original Create Goal screen:
When you have created a goal, you will be able to see that goal on the Account Balances screen, which you are presented with when you log in to Internet Banking or can navigate to from the top navigation bar.

On the right side of the Account Balances screen you will also see new quick link to the Goals section. It will provide an overview of all of the goals that you have set up including your progress, and provide a link to navigate to the Goals overview page, where you can view and edit all of your goals.
This should be all you need to know to start saving for everything that you want. If you do have any questions you can call out Customer Relationship Centre on 13 25 85 Monday - Friday 8.00am - 8.00pm, Saturday 9.00 - 3.00pm ACST.
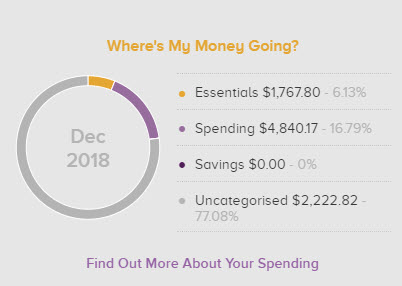
Changes to the Account Balances Page
1. Once you have set up Beyond Finance Manager, you will notice a new account snapshot on the Account Balances page. Like the other accounts snapshots, you will initially see your account balance and can see more details about all of your Beyond Financial Manager accounts by clicking the ellipsis (…) on the right hand side.
2. When the Beyond Finance Manager account snapshot is expanded, you will see the account balances of each of your Beyond Finance Manager accounts.
3. When the Beyond Finance Manager account snapshot is expanded you will also see a list of recent transactions. This is a combined transaction list for all of your Beyond Finance Manager accounts so there is no running balance.
4. On the right hand side of the screen you will notice two graphs, Money Going and Spend Tracker. The Money Going graph will display how much money has been spent in each category for the month to date.
The Spend Tracker graph will display the dollar value of your spending this month, compared with your spending at the same time last month. In the view above, it is the second of September so the yellow line on the Spend Tracker graph stops at this date. As the month progresses you will see a full comparison of how you are tracking compared to the purple line, which will always represent the previous month.
Changes to the Transaction History Page.
Basic Search.

1. The Beyond Finance Manager Accounts drop down view shows the combined transaction history of all of your selected Beyond Finance Manager accounts. Click the drop down arrow to see individual transaction details.
2. Click "About Beyond Finance Manager consolidated accounts" link for more information about the Beyond Finance Manager combined accounts view.
3. As on the Spend Tracker Page, you can see the category icons next to each transaction. You can refer to the legend for all category icons on the right side of the screen.
4. The amount for each transaction is shown to the right, along with the ellipsis (…), which you can click on to categorise or re-categorise any debit transaction. You will not see a running balance next to each transaction when you are viewing transactions for Beyond Finance Manager, as you cannot view balances for more than one account at once.
Advanced search.
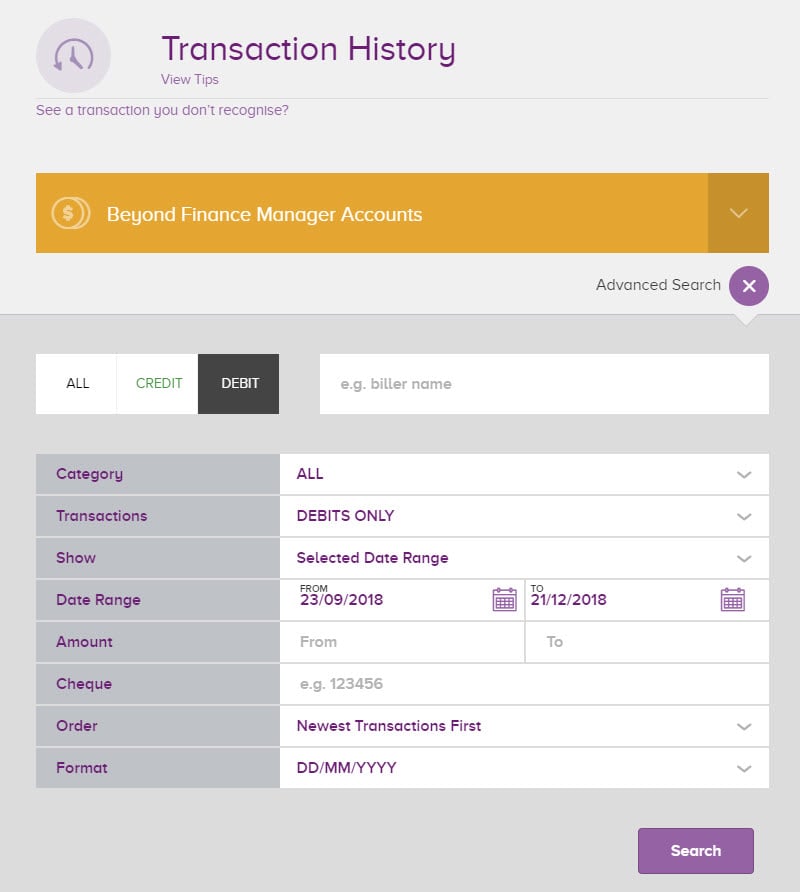
Once Beyond Finance Manager setup is complete, you will be able to use Advanced Search to search by category.
The rest of the functions for advance search remain the same. For a comprehensive overview of the advance search function, refer to the Internet Banking User Guide, which is available on the log on screen for Internet Banking and under User Guides in the help menu within Internet Banking.


